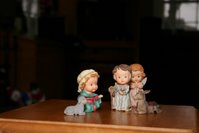
This Activity will give you a feel for the options you have with your flashes.
I think you have all invested in an external flash, as pricey as they are, lets have them
start to earn their keep.
Keep in mind none of these examples are the wrong way to do it, they are all
tools you have to get the photo you want.
Example 1: Long exposure with natural light, no flash (1.0sec. @ F5.6)


Pros: A natural look, Subjects are 3 dimensional
Cons: Live subjects will move during a long shutter time and look blurry. Background light may become over exposed or subjects are under exposed because of bright background.
Example 2: Cameras built in flash(1/60 sec. @ F5.6)


Pros: To keep the subject exposed properly the camera throttled back the flash, this left
the back ground black, an effect you might what.
Cons: If you hoped to capture the background your out of luck, subjects also look very 2 dimensional because all the shadows are gone.
Example 3: Direct External flash(1/60sec. @ F5.6)


Pros: Same as with on camera flash except the flash has been raised up a few inches so the
models have a bit more dimension. The farther away the flash is from the lens the less chance
for red eye with people.
Cons: Same as with on camera flash but a bit better.
Example 4: Bounce off the ceiling with external flash(1/60sec. @ F5.6)


Pros: Looks more like natural light.
Cons: Shadows created by a direct overhead light are not always the look we want. Notice the change in light color because of the color of the ceiling. If you are farther away from your subjects the bounced light will not be as strait down.
Example 5: Bounce with a defector (1/60sec. @ F5.6)


The reflector I use is plastic and allows some light to go up and some to go to the models
Pros: Soft shadows with good dimension. Usually not obvious is a flash was used.
Cons: Not as much light went to the ceiling so background is dark. Flash is still in line with lens so not as much dimension as with natural light that was coming from the side.
Example 6: Bounce with reflector and long exposure(0.8sec. @ F6.3)


Pros: Might be the best of both worlds. This is basically fill light; it fills in some of the strong shadows you might get with natural light. This why it is a good idea to use a flash outside when is bright out. Not obvious a flash was used but the models are well lit.
Cons: Again we have a long shutter time so live models would blur from movement. It all depends on how much availlible light you have to work with.
To get the right exposure for example 6 I shut off the flash and left the camera in auto mode(Green mode or P on canon), so it calculated how long the shutter needed to be open, Then I went to shutter priority mode (Tv on canon) and entered in the shutter speed the camera just calculated it needed with no flash. Now I turned the flash on and took the picture in shutter priority mode. This gave the exposure I needed with some soft fill light from the bounce flash and plastic diffuser card.
Experiment over Christmas with all you friends and relatives see what you come up with. Then share your favorite results and tell us what you did and why you liked it.
PS Please pray for my back to get better soon. This has been hard on Sam and the kids too. Thankyou
Have a Merry Christmas!!


